Dual-boot Ubuntu alongside Windows without breaking either
Install Ubuntu 26.04 LTS next to Windows and pick your OS at boot. Windows stays intact. The one risky step is resizing the Windows partition, and a backup makes it boring.
Dual boot means both operating systems live on the same disk and you pick one when the machine powers on. Windows stays where it is, keeps every file, and boots exactly like before. Ubuntu gets a slice of free space next to it. Nothing here is permanent: keep Ubuntu for a decade, or delete it next month and hand the space back to Windows.
The honest risk picture: one step in this project touches your Windows installation, the partition resize. Everything else is reversible. Resizes rarely go wrong, but when they do, they go very wrong, so this guide front-loads a file backup and a BitLocker recovery key check. With those two done, the scariest step becomes boring. One warning before you start: if this is a work laptop managed by an IT department, stop here. The BitLocker key may live in your company’s directory, the firmware may be locked down, and IT will not enjoy the surprise.
This guide targets Ubuntu 26.04 LTS (Resolute Raccoon), the current long-term support release. LTS versions get five years of security updates, which is why they are the right pick for a first install.
Step 1: Prep Windows
Half the work happens before Ubuntu ever enters the picture. Do these in order.
Back up your files
External drive, cloud storage, whatever you already use. The resize step in this guide has a low failure rate and a high failure cost. A backup converts “my documents are gone” into “I lost an afternoon”. If you skip this step, you have decided the risk is acceptable; make that decision consciously.
Find your BitLocker recovery key
This is the number one way people lock themselves out of Windows during a dual-boot install, so do it even if you think encryption is off.
Check whether encryption is on: on Windows 11 Home, Settings > Privacy & security > Device encryption. On Pro, Control Panel > System and Security > BitLocker Drive Encryption. Or open an admin terminal and run:
manage-bde -statusIf encryption is on, save the recovery key somewhere that is not this computer: phone, paper, password manager. For a personal Microsoft account the key is at aka.ms/myrecoverykey; for a work or school account, aka.ms/aadrecoverykey.
Then turn BitLocker off and let Windows finish decrypting before you continue. The Ubuntu installer cannot resize an encrypted partition; if it finds BitLocker active, it stops and sends you back to Windows anyway. Decryption takes a while on a big drive. You can turn BitLocker back on once Ubuntu is installed and both systems boot cleanly. Keep the recovery key handy for that first re-encrypted boot.
Free up disk space
Ubuntu needs at least 25 GB to install; 50 GB or more is comfortable if you intend to use it daily. The installer takes this space from C: with a slider, so you do not need to shrink anything yourself. You just need C: to have that much free. Settings > System > Storage shows what is eating the disk; Temporary files and the Downloads folder are the usual suspects.
Turn off Fast Startup
Fast Startup is a half-hibernate: at shutdown, Windows writes system state to disk and leaves the file system in a not-quite-closed state. Ubuntu sees that as a dirty NTFS volume and will mount your Windows partition read-only, or refuse entirely. Turn it off: Control Panel > Hardware and Sound > Power Options > “Choose what the power buttons do” > “Change settings that are currently unavailable” > untick “Turn on fast startup” > Save changes.
Install pending Windows updates
Run Windows Update until it has nothing left, then reboot. You do not want a half-installed feature update sharing a disk operation with a partition resize, and you do not want Update rebooting into a changed boot setup mid-install.
End state: files backed up, BitLocker off with the recovery key saved elsewhere, 25 GB or more free on C:, Fast Startup off, Windows Update quiet.
Step 2: Download the Ubuntu ISO
Get the desktop image from ubuntu.com/download/desktop. You want Ubuntu 26.04 LTS; the file is ubuntu-26.04-desktop-amd64.iso, about 6 GB.
Optional but recommended: verify the download. Open PowerShell in your Downloads folder and run:
certutil -hashfile ubuntu-26.04-desktop-amd64.iso SHA256Compare the output against the value for the desktop ISO in the SHA256SUMS file at releases.ubuntu.com/26.04. Identical means the download is intact and untampered. Different means download it again before going anywhere near a USB stick.
Step 3: Write the ISO to the USB stick
Everything on the stick gets erased. Move anything you care about off it first.
Rufus (Windows)
Download Rufus from rufus.ie; the portable version runs without installing. Then:
- Device: your USB stick. Unplug other USB drives so there is nothing to mix up.
- Boot selection: SELECT, then pick the Ubuntu ISO.
- Partition scheme: GPT. Target system reads “UEFI (non CSM)”, which is right for any machine that shipped with Windows 10 or 11.
- Leave the rest at defaults and click START.
- Rufus detects that the Ubuntu ISO is an ISOHybrid image and asks how to write it. Keep Write in ISO Image mode (Recommended) selected and click OK.
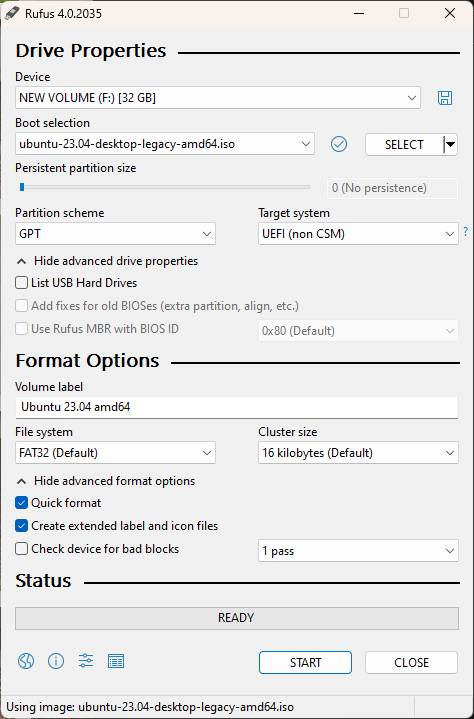
Screenshot: Rufus 4.0 by Evelyn Marie, via Wikimedia Commons, GPL v3. The ISO version in the picture is older; your window will say 26.04.

balenaEtcher (Windows, macOS, Linux)
If you would rather not think about partition schemes, balenaEtcher is three clicks: Flash from file (pick the ISO), Select target (pick the stick), Flash. Afterwards Windows may claim the stick needs formatting; ignore it, that is what a raw image write looks like to Windows.
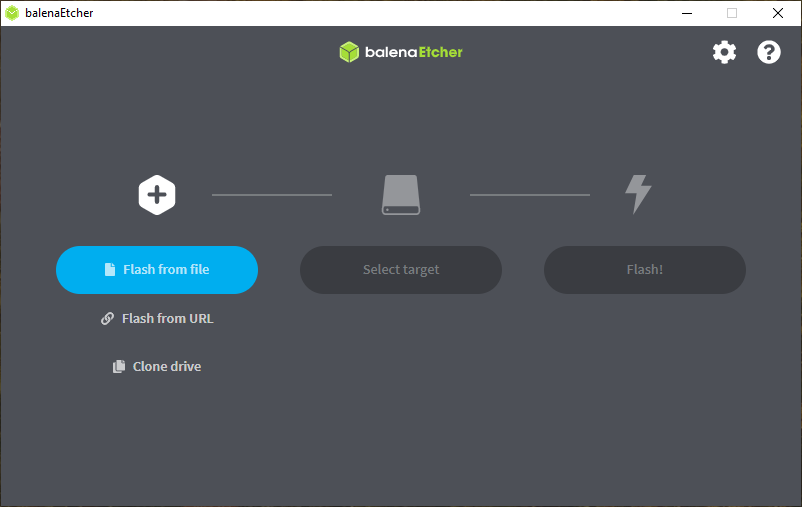
Screenshot: balenaEtcher, via Wikimedia Commons, CC0.

End state: a USB stick that boots Ubuntu.
Step 4: Boot the live session
Leave the stick plugged in and reboot. As soon as the vendor logo appears, tap the boot-menu key. F12 is the most common; the exact key depends on the manufacturer:
- Dell, Lenovo, Acer: F12
- HP: Esc, then F9
- ASUS: Esc or F8
- MSI: F11
If no menu appears, go into firmware settings instead (usually F2 or Del at the same moment) and move the USB stick to the top of the boot order. Leave Secure Boot alone: Ubuntu’s bootloader is signed and boots fine with it enabled.
From the menu on the stick, pick Try or Install Ubuntu. After the language and keyboard questions, the installer offers to try or to install. Pick Try Ubuntu first. This runs the full desktop from the stick without touching your disk, and it is the cheapest possible hardware test: check that Wi-Fi connects, the display looks right, and the touchpad behaves. If something is broken here, it will be broken after install too, and you have lost nothing by finding out now.
End state: Ubuntu running from the stick, Wi-Fi working, disk untouched.
Step 5: Run the installer
Double-click the install icon on the live desktop. The early screens are the easy ones: language, keyboard, Wi-Fi. Pick the interactive install when asked, and accept the offer of third-party drivers for graphics and Wi-Fi hardware; on laptops that box is often the difference between working and missing Wi-Fi.
The screen that matters asks how you want to install Ubuntu. Choose Install Ubuntu alongside Windows Boot Manager. “Windows Boot Manager” is your Windows install; the label comes from the boot entry, not the marketing name. Do not pick “Erase disk and install Ubuntu”, which does exactly what it says to your Windows partition.
Next comes a slider dividing the disk between Windows and Ubuntu. Drag it to give Ubuntu its share: 25 GB minimum, 50 GB or more if you plan to use it seriously. Windows keeps everything on its side.
If the alongside option is missing, stop and check the pitfalls section; the usual causes are BitLocker still active, an Intel RST/RAID storage mode, or a disk too full to shrink. Do not “solve” it by picking manual partitioning on your first install.
Confirm, create your user account and password, pick your time zone, and let it run. Ten to twenty minutes on most hardware. When it asks you to reboot, remove the stick when prompted.
Step 6: First boot
Instead of going straight into Windows, the machine now shows a GRUB menu with Ubuntu at the top and Windows Boot Manager further down, plus a countdown that boots Ubuntu if you do nothing.
Boot Ubuntu and log in. Install updates first; the ISO is a snapshot and there is always a backlog. Software Updater will offer on its own, or do it in a terminal:
sudo apt update && sudo apt full-upgradeThen reboot once more and pick Windows Boot Manager, just to confirm Windows still starts cleanly and your files are all there. Once both sides boot, you can turn BitLocker back on in Windows if you had it before; keep the recovery key within reach for that first boot after re-enabling.
End state: both systems boot from the GRUB menu, Ubuntu fully updated, Windows verified intact.
Step 7: Two small fixes
The clock
Windows stores the hardware clock in local time, Ubuntu stores it in UTC, so each OS “corrects” the clock for the other and you end up hours off after every switch. The pragmatic fix is to make Ubuntu speak Windows’ dialect:
sudo timedatectl set-local-rtc 1 --adjust-system-clockThe command prints a warning that local-time RTC is not fully supported; the edge cases are around time zone changes and daylight saving, and on a desktop dual boot it is the fix everyone uses. Confirm with timedatectl, which should now show “RTC in local TZ: yes”. The alternative direction, teaching Windows to use UTC via a registry change, works too but takes more steps than this one line.
Default boot entry
GRUB boots Ubuntu by default. If you want Windows as the default, or want GRUB to remember whatever you booted last, edit its config:
sudo nano /etc/default/grubFor remember-my-last-choice, set:
GRUB_DEFAULT=saved
GRUB_SAVEDEFAULT=true
Or set GRUB_DEFAULT to a number: entries count from zero, top of the menu, exactly as you see them on screen at boot. Either way, apply the change with:
sudo update-grubGRUB_TIMEOUT in the same file controls the countdown length if the default feels too quick or too slow.
Living with it
Ubuntu can read the Windows partition (it shows up in the Files app), so your documents are reachable from both sides; with Fast Startup off it is writable too. Windows cannot read the Ubuntu side, which is fine. Keep both systems updated, since each one now guards half your disk. After a couple of months the GRUB menu tells you the truth about which system you actually use, and at that point you either shrink Windows further or hand the space back. Both directions are covered: the slider got you in, the rollback section gets you out.
Verify it works
- Power the machine on: a GRUB menu appears listing Ubuntu and Windows Boot Manager.
- Pick Ubuntu: it boots to the desktop, Wi-Fi and sound work, and cat /etc/os-release shows Ubuntu 26.04 LTS.
- Reboot and pick Windows Boot Manager: Windows starts normally, no recovery prompt, all files present.
- After the clock fix in step 7, Ubuntu and Windows show the same time.
When something goes wrong
Windows asks for the BitLocker recovery key at boot
A partition resize or a change in firmware settings can make BitLocker decide the machine looks different and demand the recovery key before Windows will start. This is a two-minute fix with the key and unrecoverable without it, which is why saving the key is step one of this guide. Get it from aka.ms/myrecoverykey (personal Microsoft account) or aka.ms/aadrecoverykey (work or school account), type it in, done. Windows boots normally afterwards.
The PC boots straight into Windows, no GRUB menu
A Windows feature update or a firmware reset can put Windows Boot Manager back at the top of the boot order. Ubuntu is not gone and nothing needs reinstalling. Open the one-time boot menu (same key you used to boot the USB, F12 on most machines) and pick "ubuntu" to get back in. To make it permanent, go into firmware settings and move ubuntu above Windows Boot Manager in the boot order.
The alongside option does not appear in the installer
Three usual causes. One: BitLocker is still on. The installer cannot read an encrypted Windows partition and will tell you to go back to Windows and turn BitLocker off. Two: the storage controller runs in Intel RST/RAID mode. The installer detects this and points you at help.ubuntu.com/rst; switching the controller to AHCI affects Windows too, so read that page and have your backup ready before touching it. Three: the disk is nearly full and there is nothing to shrink. Free up space in Windows and restart the installer.
Ubuntu mounts the Windows partition read-only or not at all
Fast Startup or hibernation left the NTFS volume in a half-shutdown state, and Ubuntu refuses to write to it rather than risk corrupting it. Boot into Windows, turn off Fast Startup (step 1 of this guide), then do a real shutdown. Restart also works: a Windows Restart always performs a full shutdown of the file system, only Shut Down takes the Fast Startup shortcut.
Windows shows the wrong time after you have used Ubuntu
Not broken, just a disagreement. Windows stores the hardware clock in local time, Ubuntu stores it in UTC, and each OS "fixes" the clock for the other on every boot. The one-line fix on the Ubuntu side is in step 7. Run it once and both systems agree forever.
Rollback
Dual boot is reversible, but this is the fiddliest direction, so go slowly.
- Boot into Windows. Open Disk Management (Win+R, diskmgmt.msc). The partitions Ubuntu created show up with no drive letter and no file system Windows recognizes. Right-click each one > Delete Volume. Do not touch the EFI System Partition or any recovery partition.
- Right-click C: > Extend Volume to take the freed space back. Extend only works into unallocated space sitting directly to the right of C:, which is where the installer's slider put Ubuntu, so this normally just works.
- The GRUB menu still appears because its firmware boot entry survives. The easy fix: in firmware settings, put Windows Boot Manager first in the boot order and the menu never shows again. For a clean removal, open an admin Command Prompt, run bcdedit /enum firmware, find the ubuntu entry, and delete it with bcdedit /delete followed by its identifier in curly braces.
- If you deleted the partitions before fixing the boot order and the machine now drops to a grub rescue prompt, do not reinstall anything. Open the one-time boot menu (the same key you used for the USB stick) and pick Windows Boot Manager, then fix the boot order as above. If even that fails, Windows startup repair from installation media rebuilds the boot path.
Windows itself was never modified, only shrunk. Once C: is extended and the boot order is fixed, the machine is back where it started.
References
- Ubuntu Desktop download ubuntu.com
- Ubuntu tutorial: Install Ubuntu Desktop (covers dual boot and BitLocker) ubuntu.com
- Ubuntu tutorial: Create a bootable USB stick with Rufus ubuntu.com
- Ubuntu tutorial: How to verify your Ubuntu download ubuntu.com
- Rufus rufus.ie
- balenaEtcher etcher.balena.io
- Microsoft: Find your BitLocker recovery key support.microsoft.com
- Ubuntu docs: Intel RST during installation help.ubuntu.com
Comments (0)
No comments yet. Be the first.